

🧵✨ It’s All in the Finish
5 Ways to Give Your Handmade Jewelry a Beautiful, Secure Finish
Last week in the Journal, we talked about one of those little questions almost every new bead weaver eventually asks:
“Now what do I do with this thread?” 😄
We talked about weaving our working thread back through the beadwork, securing those beginning and ending tails, and why finishing beadwork isn’t really about finding one magical knot.
But thread is only one part of the story.
If you make jewelry long enough, eventually you’ll find yourself staring at a crimp tube, wire protector, tiny piece of French wire, jump ring, or unfamiliar clasp and thinking:
Okay…now what do I do with THIS? 😂
I’ve certainly been there.
The more I’ve learned about jewelry making, the more I’ve realized that knowing how to finish a piece is every bit as important as knowing how to begin one.
A beautiful necklace can have perfectly chosen beads. A bracelet can contain hours of careful bead weaving. But if the clasp isn’t attached securely, a crimp isn’t properly closed, or a thread isn’t protected at a stress point, all of that beautiful work can be at risk.
So today we’re moving beyond the thread and looking at five common ways jewelry makers finish their pieces.
1. 🔗 Crimps — Small but Mighty
A crimp may be one of the smallest components in a piece of jewelry, but it has one of the most important jobs. This tiny piece of metal secures the bead-stringing wire to the clasp and helps hold the entire design together. If the crimp fails, everything else can fail with it.
Crimps come as small, round crimp beads and longer, cylindrical crimp tubes. They are available in micro sizes, commonly used #2 and #3 sizes, and larger sizes for heavier wire or multiple strands. Each size requires the appropriate tool—micro, standard, or larger crimping pliers.
The correct crimp is determined by the diameter of the bead-stringing wire, not simply by whether the wire contains 7, 19, or 49 strands. The 49-strand wire shown here recommends either a #2 crimp bead or a #3 crimp tube. Other 49-strand wire diameters may require different sizes, so always check the wire package before choosing your crimp.
When closing a crimp, use the correctly sized crimping pliers and follow the directions for that particular tool. With standard crimping pliers, the crimp is first compressed in the forming station and then rounded in the rounding station. Before adding a crimp cover, give the wire a gentle tug to make sure the connection is holding securely.
This is also one place where quality matters. Cheap crimps may split, crack, flatten unevenly, or fail to grip the wire securely. The low-quality crimp shown in the photograph split when it was compressed instead of closing smoothly around the wire. Once a crimp cracks or separates, discard it—never reuse it or try to conceal the damage beneath a crimp cover.
Good-quality crimps are a small investment compared with the beads, materials, and time that go into a finished piece. A beautiful piece of jewelry is only as dependable as the tiny crimp holding it together.
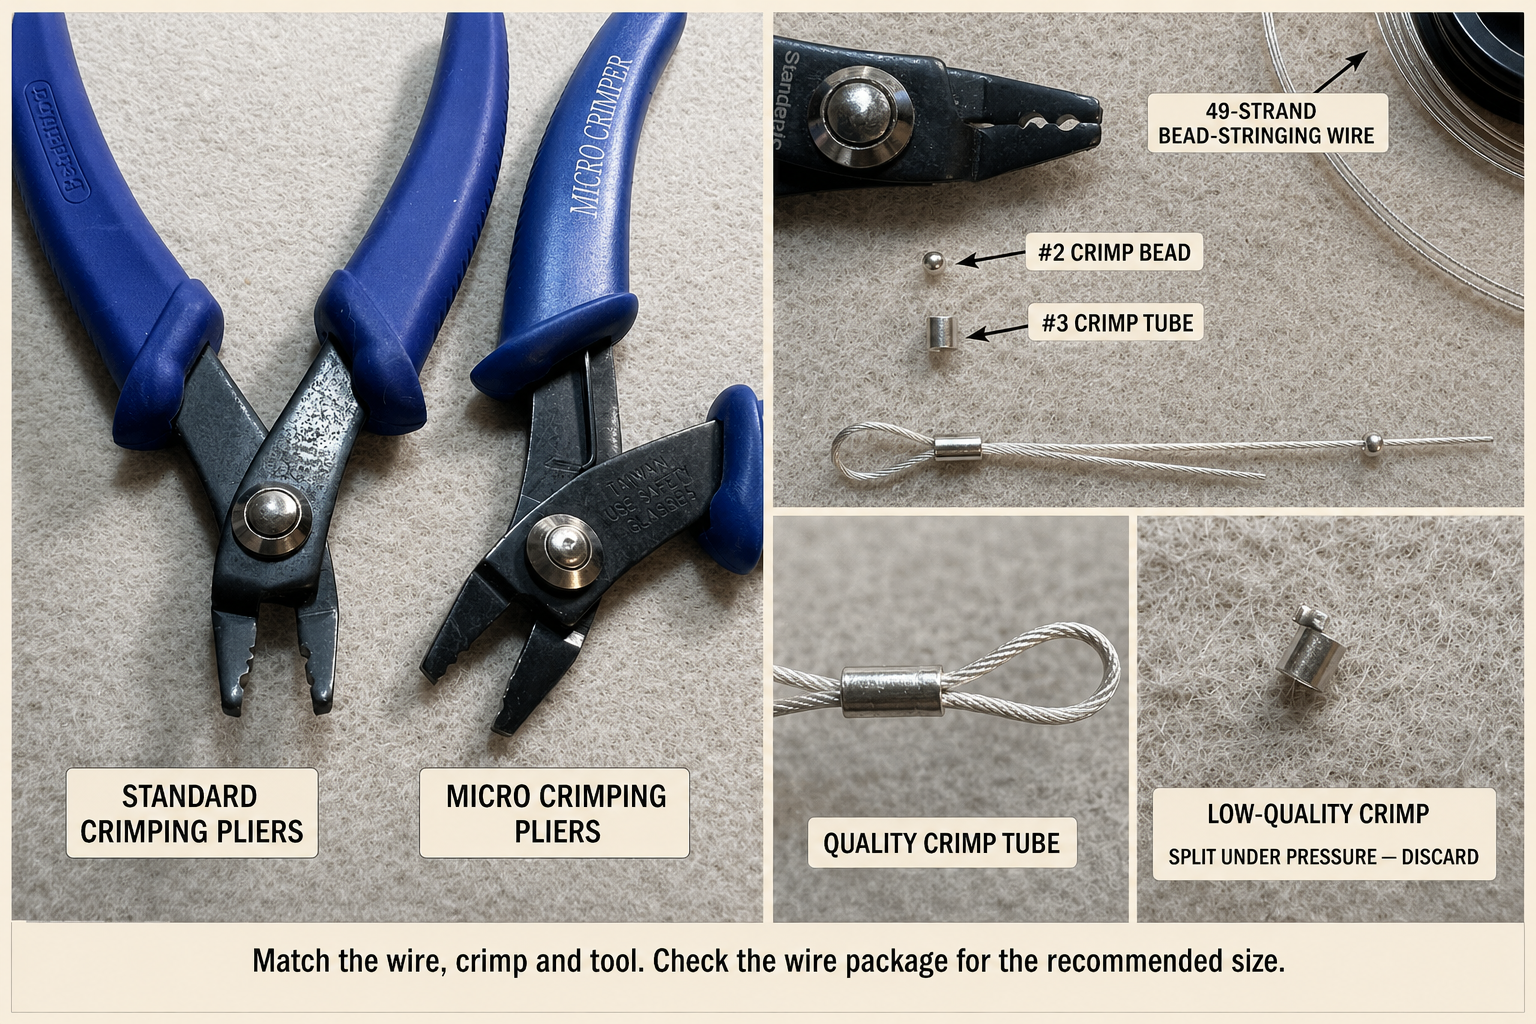
Close It, Round It, Test It
Use the correct crimp and the correctly sized tool. Form the crimp, round it, and finish with a gentle tug test before adding a crimp cover. That tiny connection can make all the difference.
2. 🛡️ Wire Protectors — Protecting the Vulnerable Spot
Here’s another tiny finding that makes much more sense once you understand what it does.
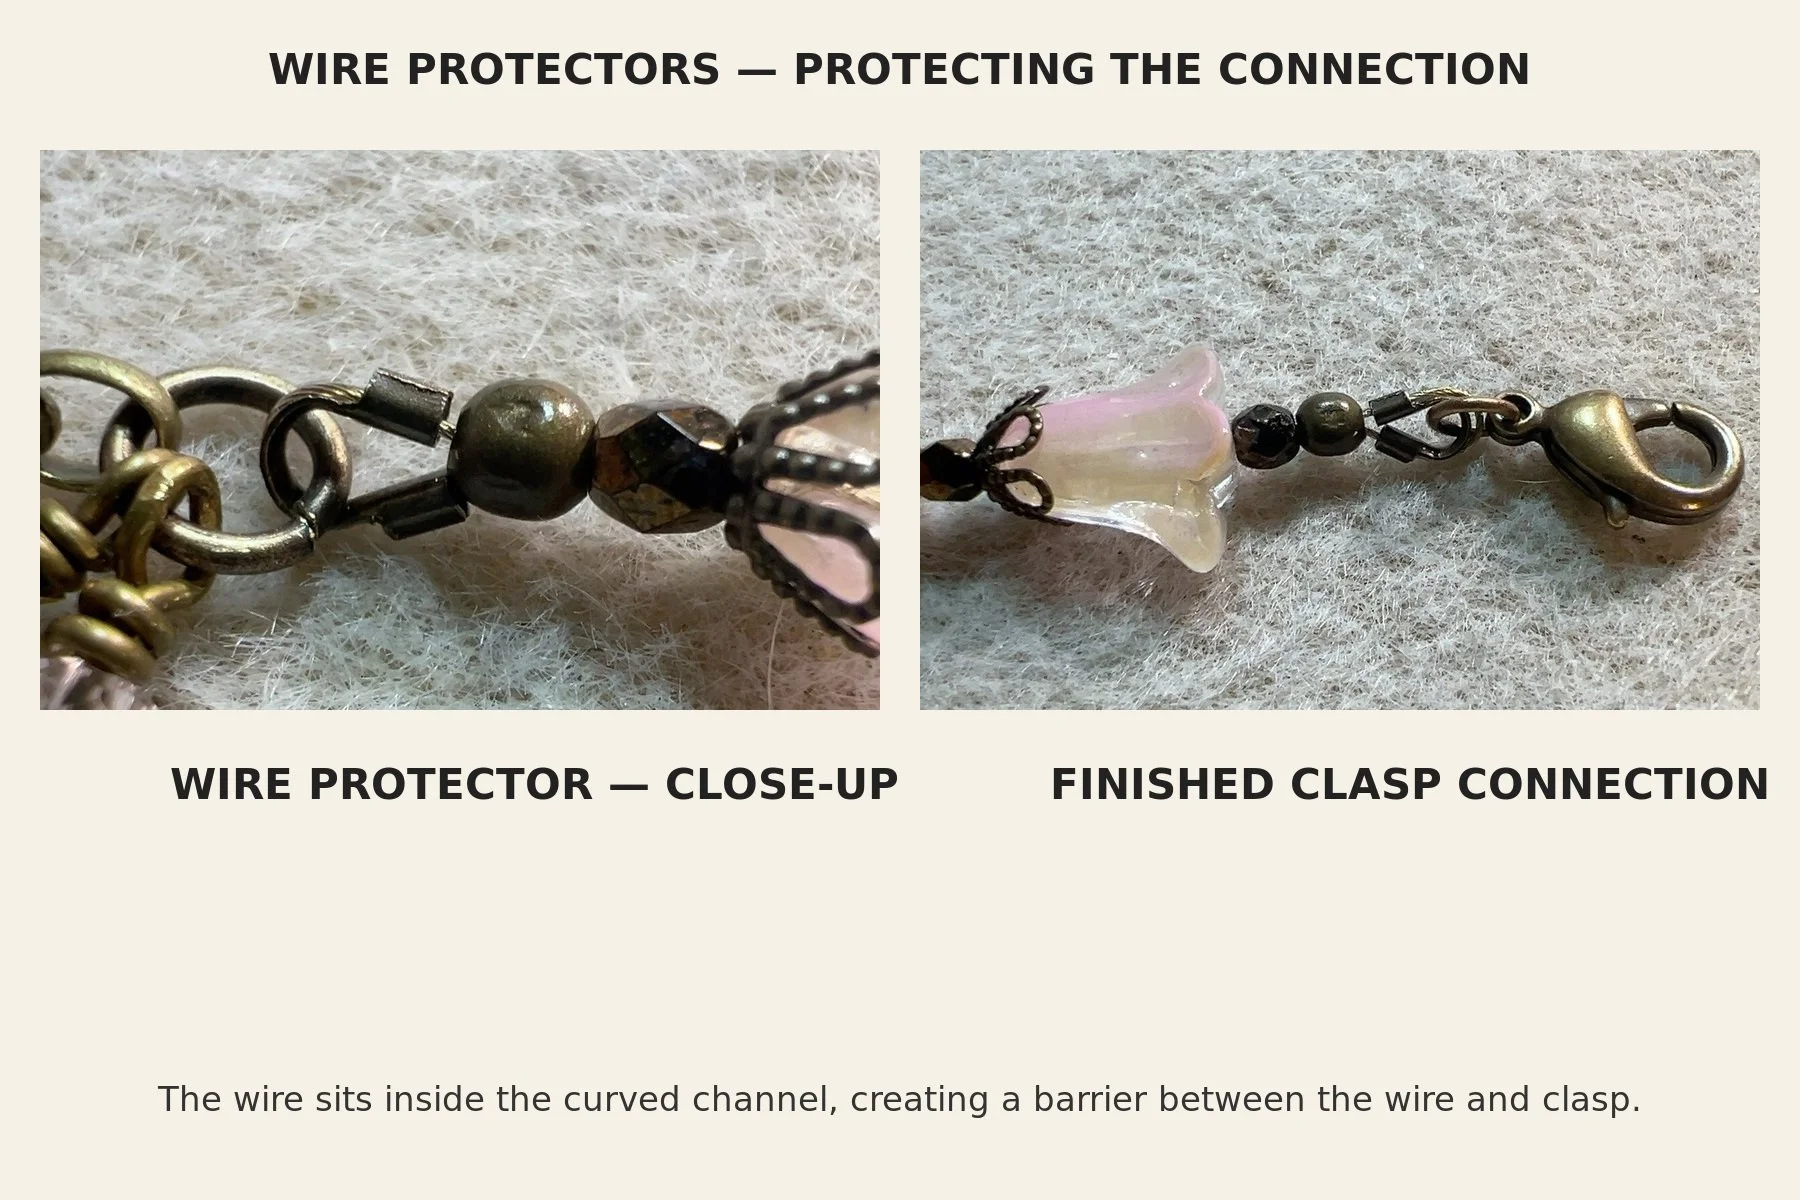
A wire protector, sometimes called a wire guardian, is the small horseshoe-shaped metal finding you may see between the bead-stringing wire and the clasp. The wire travels up one side, around the curved channel, and back down the other. The clasp or connecting ring rests inside that protected curve.
Why bother?
Every time you wear a bracelet or necklace, that connection point moves. Over time, repeated friction against a clasp or connecting ring can weaken exposed bead-stringing wire. A wire protector creates a smooth barrier between the wire and the metal connection.
To use one, guide the bead-stringing wire through the first opening, around the curved channel, and back through the second opening. Make sure the wire sits smoothly inside the channel without crossing, twisting, or being forced into place. The clasp or connecting ring can then be attached within the protected curve.
The crimp belongs below the wire protector, on the two wire ends—not inside the protector itself. Once the crimp is secured, give the connection a gentle tug test before trimming the excess wire or adding a crimp cover.
I love finishing details like this because they remind me that good jewelry construction isn’t always about what we can see. Sometimes it’s about protecting the parts we can’t.
3. 🧵 French Wire — Tiny, Elegant, and Surprisingly Useful
The first time you see French wire, you might wonder what you’re supposed to do with that tiny metal coil.
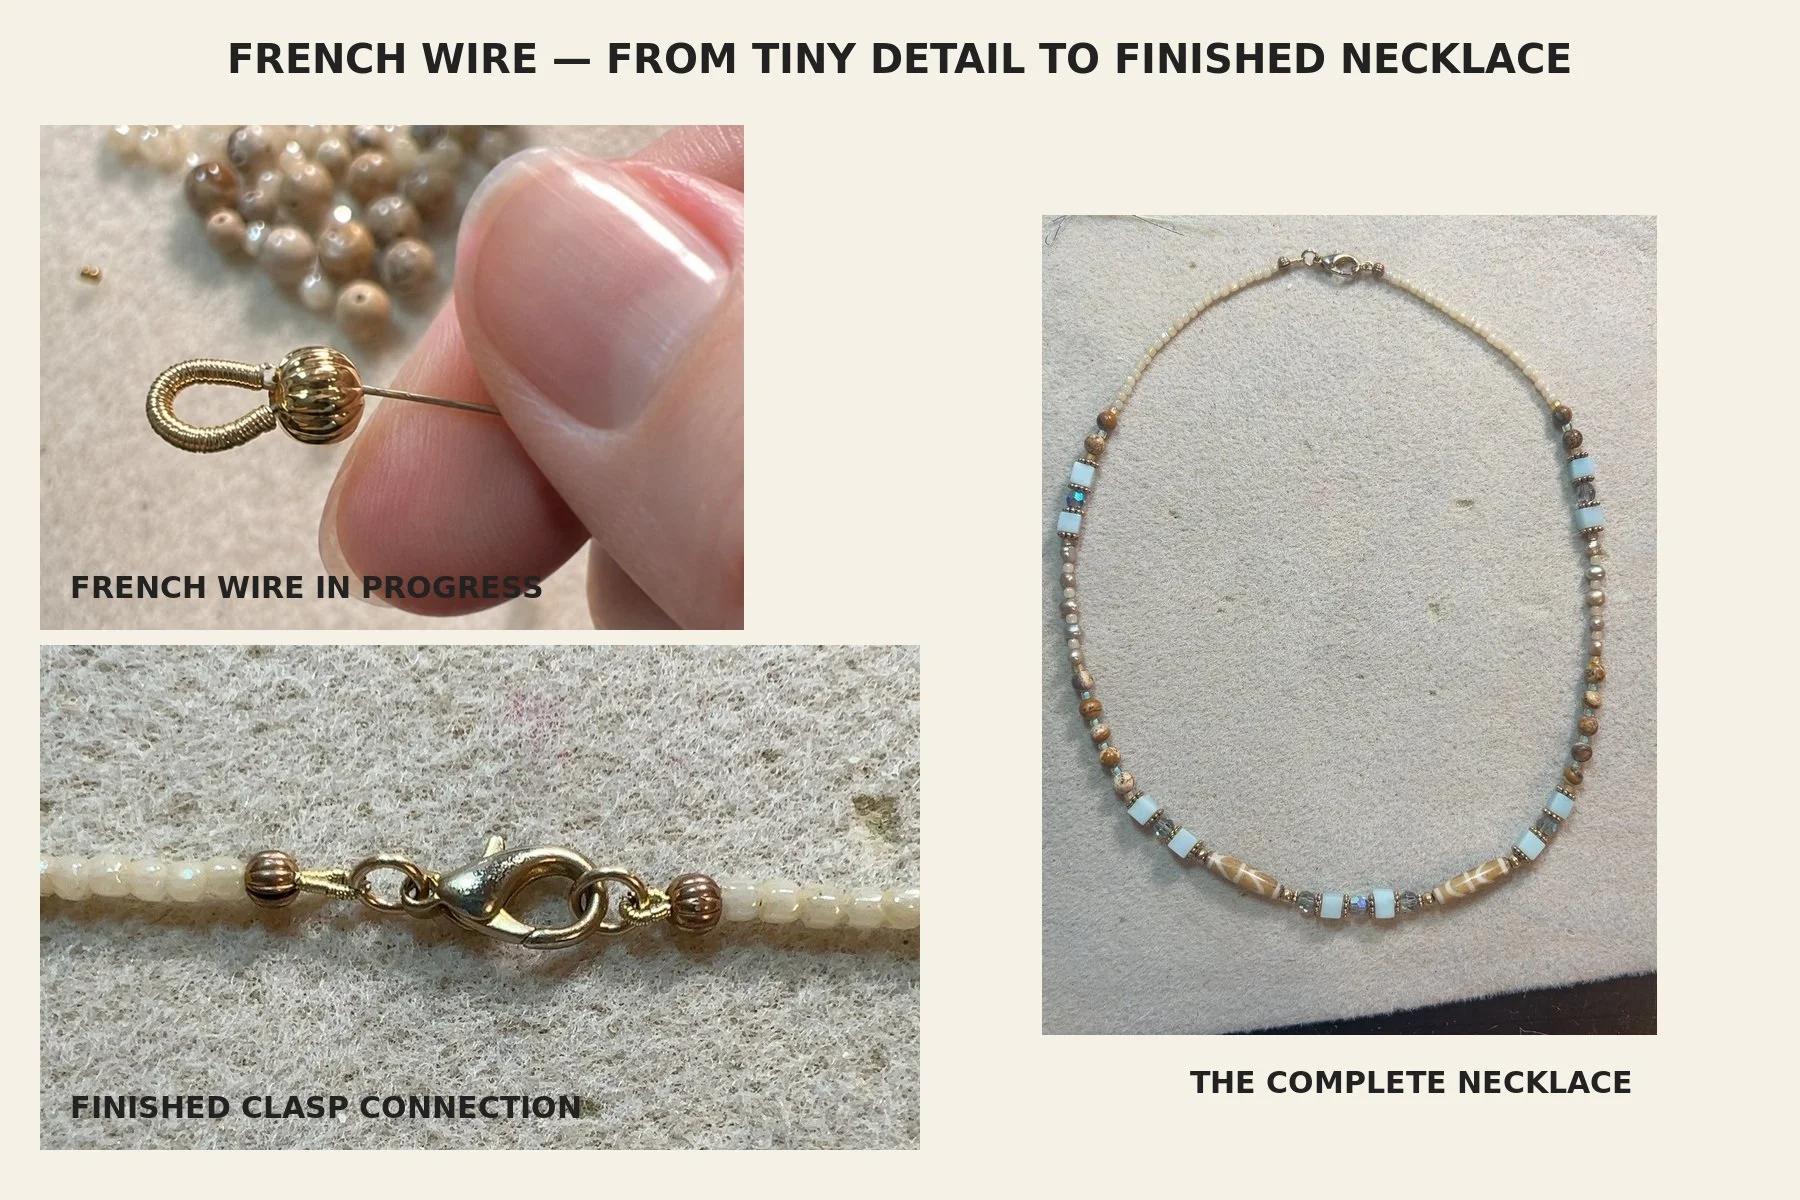
French wire—also called bullion or gimp—is a very fine, hollow coil of metal traditionally used with thread or silk. It is not the same as bead-stringing wire. Instead, the thread passes through the center of the French wire, creating a small protective sleeve where the thread meets a clasp, jump ring, or other finding.
To use it, cut a short piece of French wire and slide it onto the working thread. Pass the thread through the clasp or connecting ring, then guide it back through the beadwork. As the thread is tightened, the French wire forms a neat little metal-covered loop around the connection.
French wire is delicate, so handle it gently. Avoid crushing, stretching, or pulling the coil apart. The finished loop should curve smoothly around the finding without gaps or sharp bends.
It is especially lovely for pearls, delicate necklaces, and traditional stringing techniques. The clasp touches the French wire rather than repeatedly rubbing against exposed thread, providing both protection and a beautifully polished finish.
It’s another tiny detail that does a great deal of work—protecting the thread while making the finished connection look intentional and elegant.
The French wire shown here belongs to one of my very favorite necklaces. I love the soft mix of pale aqua, warm cream, bronze, and pearl tones—and I love that such a tiny finishing detail helps protect the piece I enjoy so much.
4. 🪡 Woven Threads — Our Lesson From Last Week
Of course, we can’t talk about finishing jewelry without coming back to bead weaving.
Last week we went into this technique more deeply, but it’s worth remembering the basic idea:
Don’t simply knot your thread beside the last bead, snip it and hope for the best. 😉
Instead, weave your working thread back through the existing beadwork.
Follow the established thread path when possible. Change direction. Depending on the stitch, you may add a small half-hitch knot around an existing thread bridge and then continue weaving through additional beads before trimming.
And don’t forget that beginning tail!
Both ends deserve the same attention.
The strength comes from allowing the surrounding beadwork to help secure the thread rather than expecting one tiny knot to do all the work.
Missed last week’s Journal? Read How to Finish Your Beadwork: A Few Simple Tips for a closer look at weaving in and securing beginning and ending threads.
5. 🔨 Wrapped Loops, Jump Rings & the Final Connection
Then there’s wirework.
If you’re making beaded links, earrings, charms, pendants or wire-wrapped jewelry, a wrapped loop can create a beautiful and very secure connection.
The wire is formed into a loop and the remaining tail is wrapped neatly around the stem before being trimmed.
One lesson worth remembering:
If something needs to be permanently captured inside that loop, put it on BEFORE you finish wrapping the loop!
Ask me how jewelry makers learn that one. 😄
Jump rings are another tiny component that can make—or break—a finish.
One of the first things every jewelry maker should learn is how to open one correctly.
Rather than pulling the ends apart and distorting the circle, hold each side with pliers and twist the ends sideways. Add your component, then twist the ring closed again.
A properly closed jump ring should have little or no visible gap.
Another tiny detail.
Another very important connection.
This beautiful bracelet was handmade and gifted to me by my sister, Kimberly Herrod—an incredible creator whose carefully wrapped loops transform every bead into part of a beautifully connected whole.
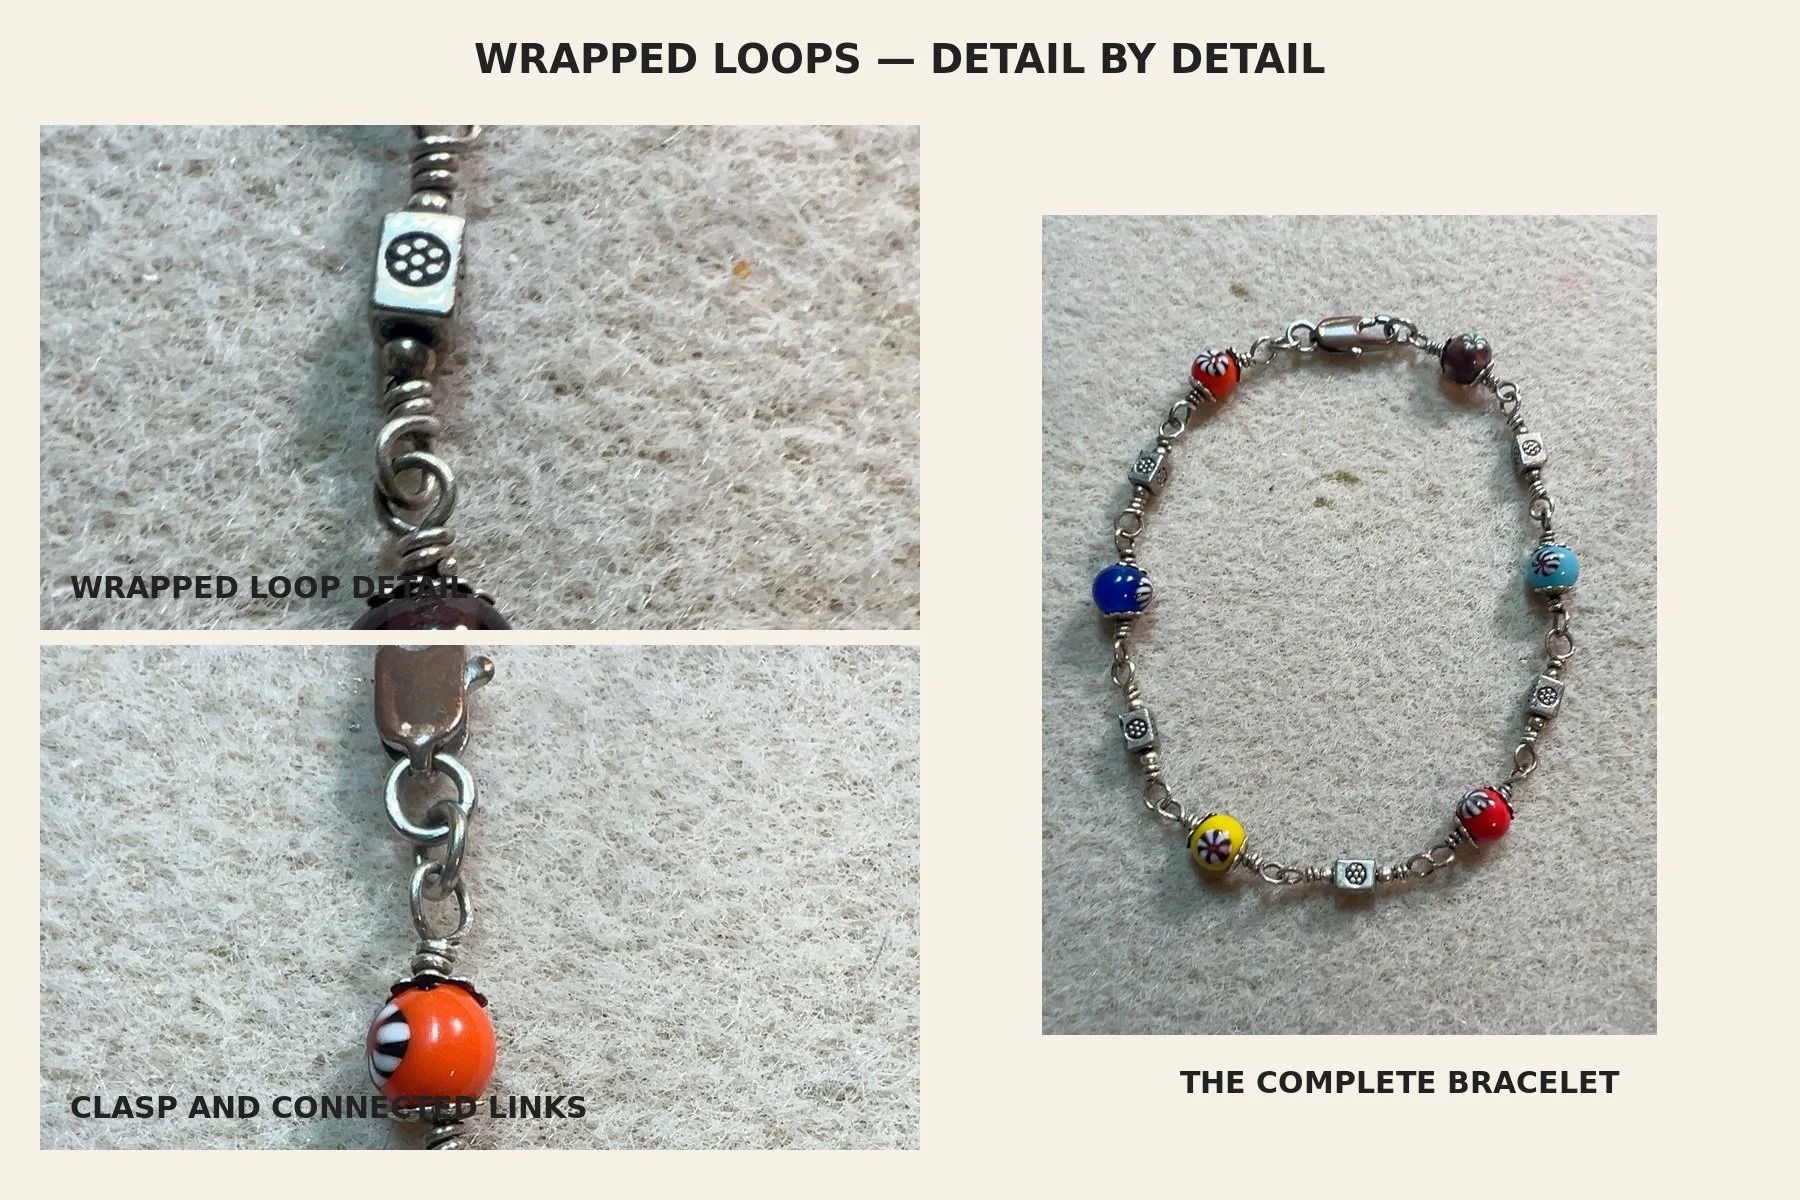
One of my favorite bracelets, handmade by my sister, Kimberly Herrod. Every wrapped loop becomes both a secure connection and part of the design.
And Then There’s the Clasp
Once we understand how our material connects, we can choose the clasp that makes sense for the piece.
And there are so many choices.
Lobster clasps come in different shapes and make dependable everyday closures.
Toggle clasps are easy to use and can become a decorative part of the design themselves.
Magnetic clasps can make jewelry much easier to put on and remove.
Slide or tube clasps work beautifully with wide beadwork and multi-strand pieces.
Box clasps can add an elegant decorative finish.
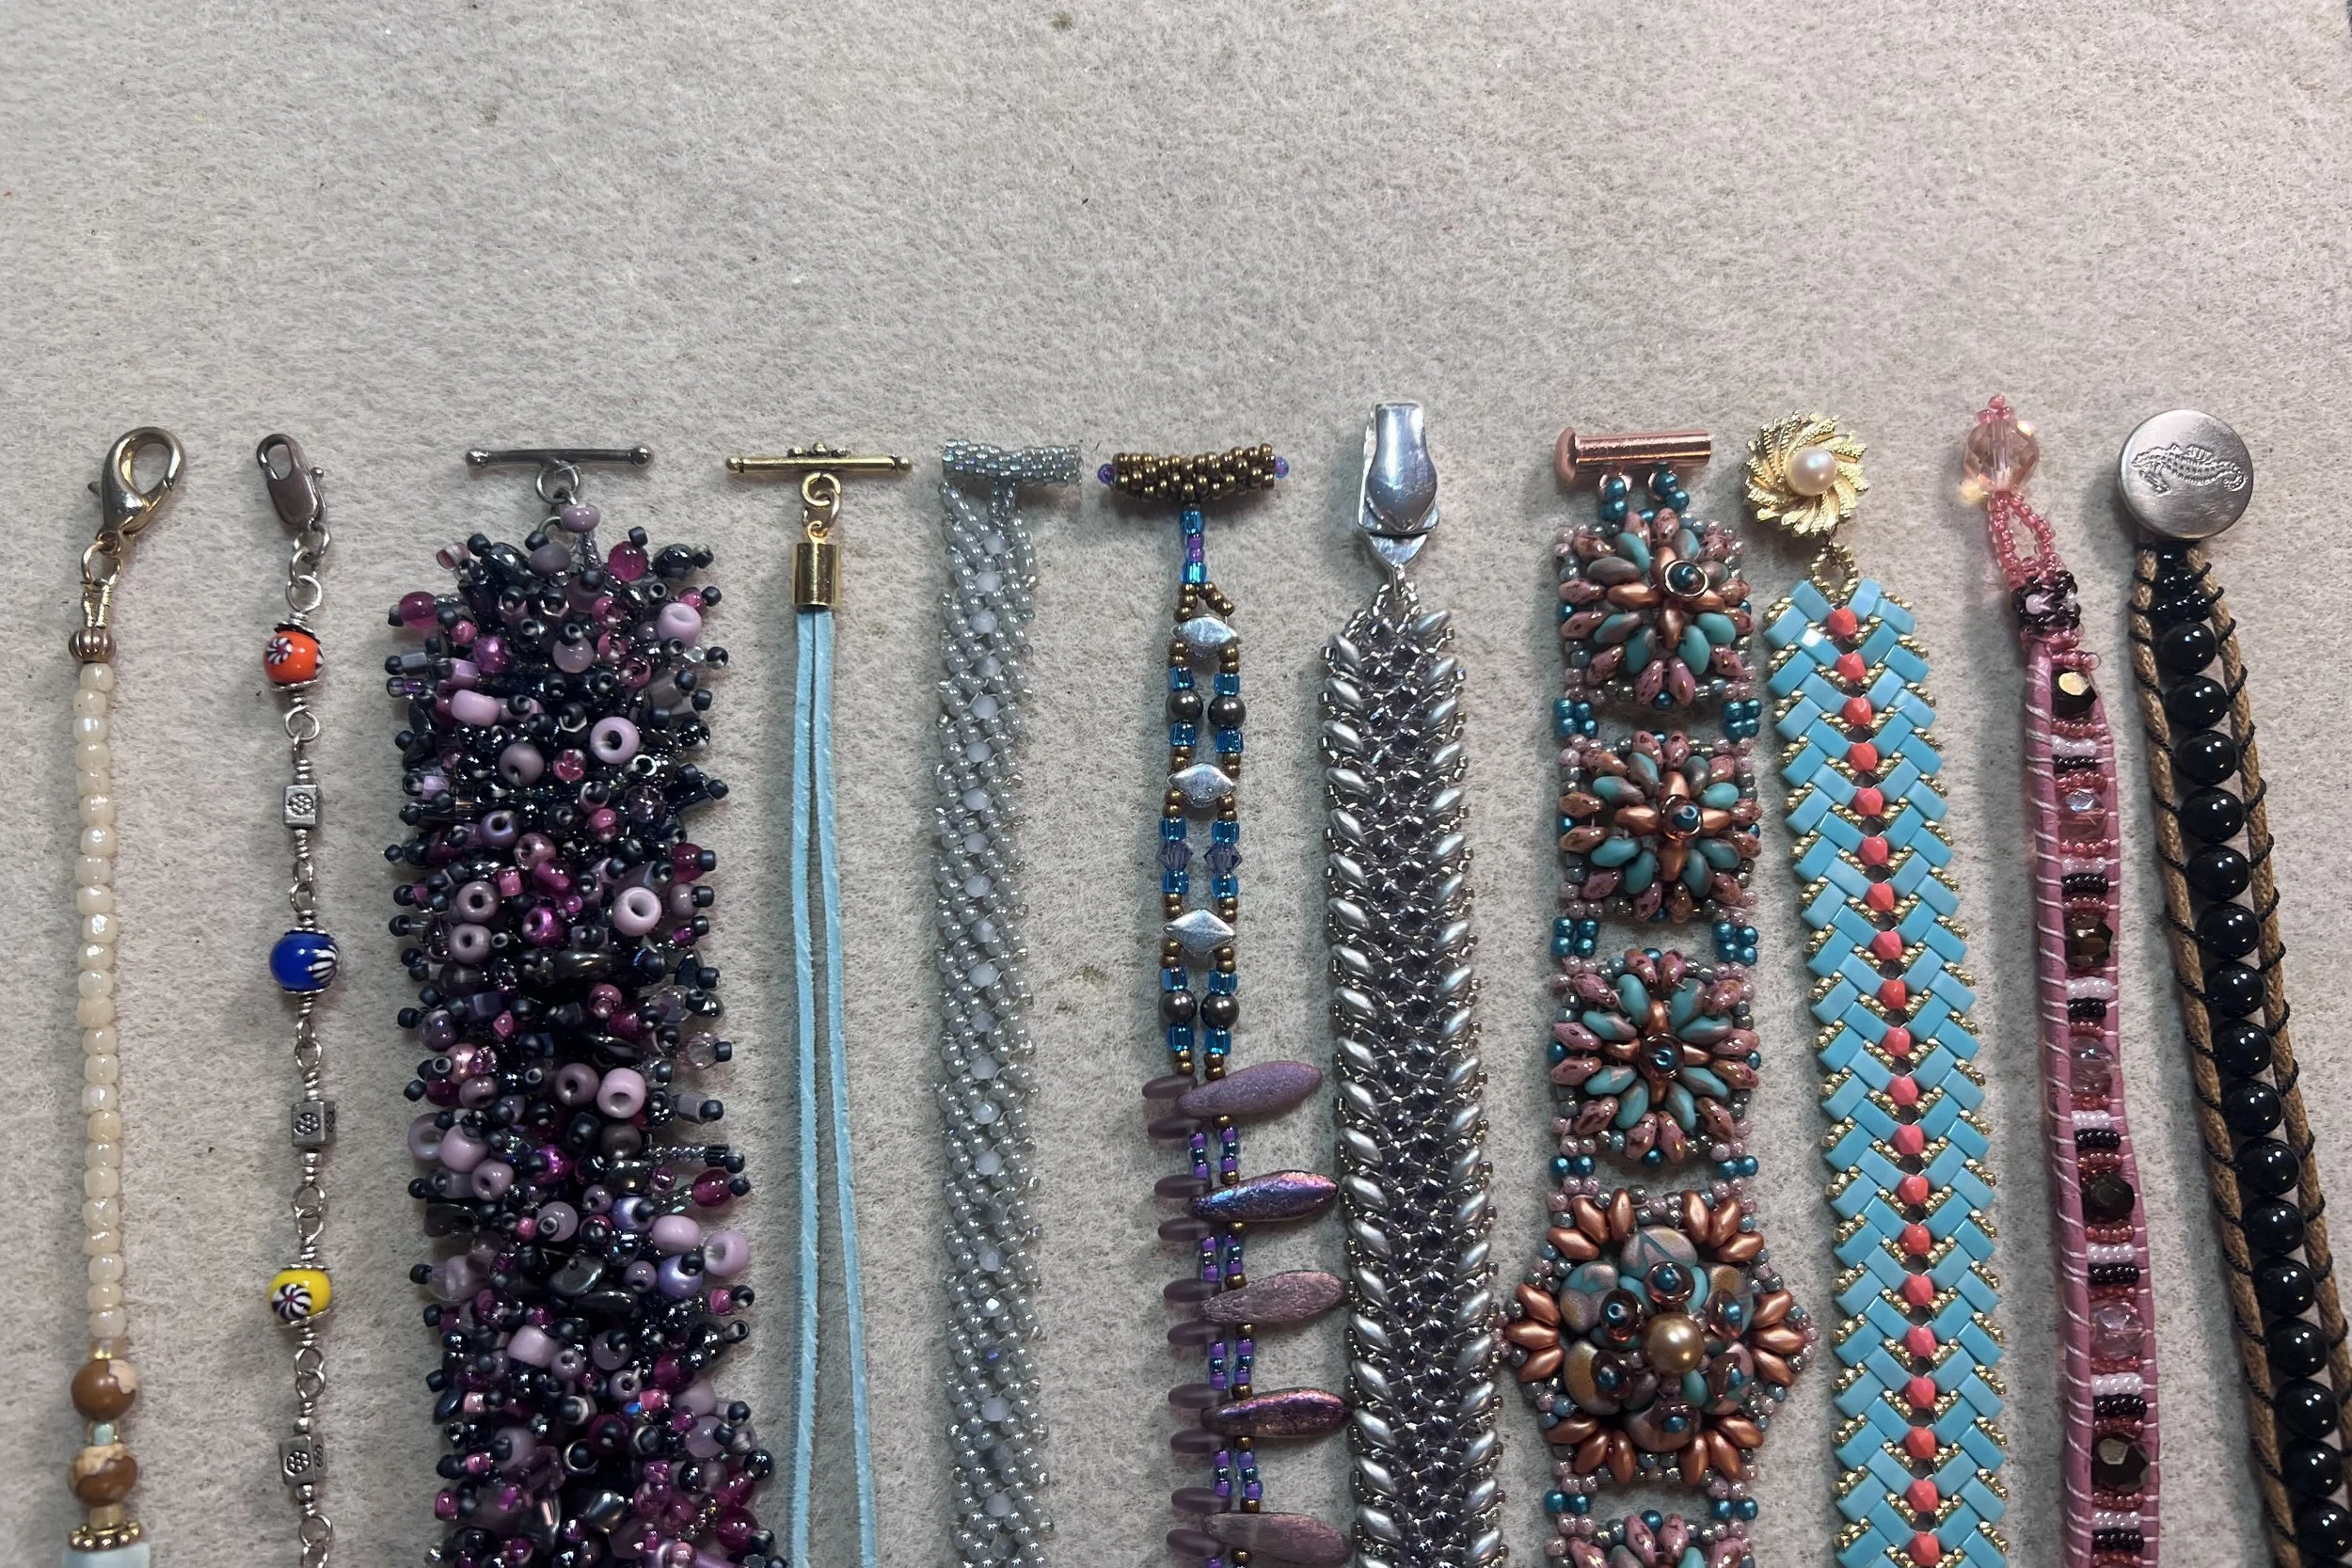
Beaded loop and button-style closure becomes part of the design rather than something added at the very end.
Some closures are created specifically for the jewelry. A beadwoven toggle can coordinate perfectly with the surrounding beadwork, while leather ends may be finished with crimps and a decorative toggle.
The right clasp should complement the materials, feel comfortable for the wearer, and securely finish the piece. It may be the final component we add, but it should never be an
💜 The Finish Is Part of the Craftsmanship
I used to think of finishing as the thing you did after you made the jewelry.
Now I see it differently.
The finish is part of making the jewelry.
The crimp nobody notices.
The tiny piece of French wire protecting a strand.
The thread carefully woven back through the beadwork.
The jump ring closed without a gap.
The clasp chosen because it works beautifully with the piece.
They’re small things.
But together, they’re what allow something we’ve spent hours creating to actually be worn, loved and enjoyed.
Before I call a piece finished, I’ve learned to do four simple things:
I look. I feel. I tug. I wear.
Look closely at every connection.
Feel for sharp wire ends, rough edges or anything that might catch.
Gently tug the clasp and connection points.
Wear the piece and make sure it moves and feels the way it should.
Because finishing isn’t about reaching the end as quickly as possible.
It’s about respecting all the work that came before it.
How we finish something matters just as much as how we begin. 💜
🐇 A Little Further Down the Bead Trail
If you’re new to jewelry making, don’t feel as though you need to master every finishing technique at once.
Start with the technique that matches the type of jewelry you’re making.
Stringing on flexible beading wire? Learn to make a really good crimp.
Working with seed beads? Practice weaving those threads securely into your beadwork.
Beginning wirework? Get comfortable making wrapped loops and properly opening and closing jump rings.
And the next time you encounter a strange little finding in the bead aisle and wonder:
“What on earth am I supposed to do with THAT?”
Pick it up.
Learn about it.
Try it.
Because apparently there’s always one more tiny thing waiting to send us down another bead rabbit hole. 😄
Until our threads cross again… 🧵✨
May your thread stay untangled, your needle easy to find, and your creativity always lead you somewhere unexpected.
With gratitude,
Kristina & Kimberly
Sun & Thread Sisters
Nature Inspired • Heart Made • Sister Crafted.