

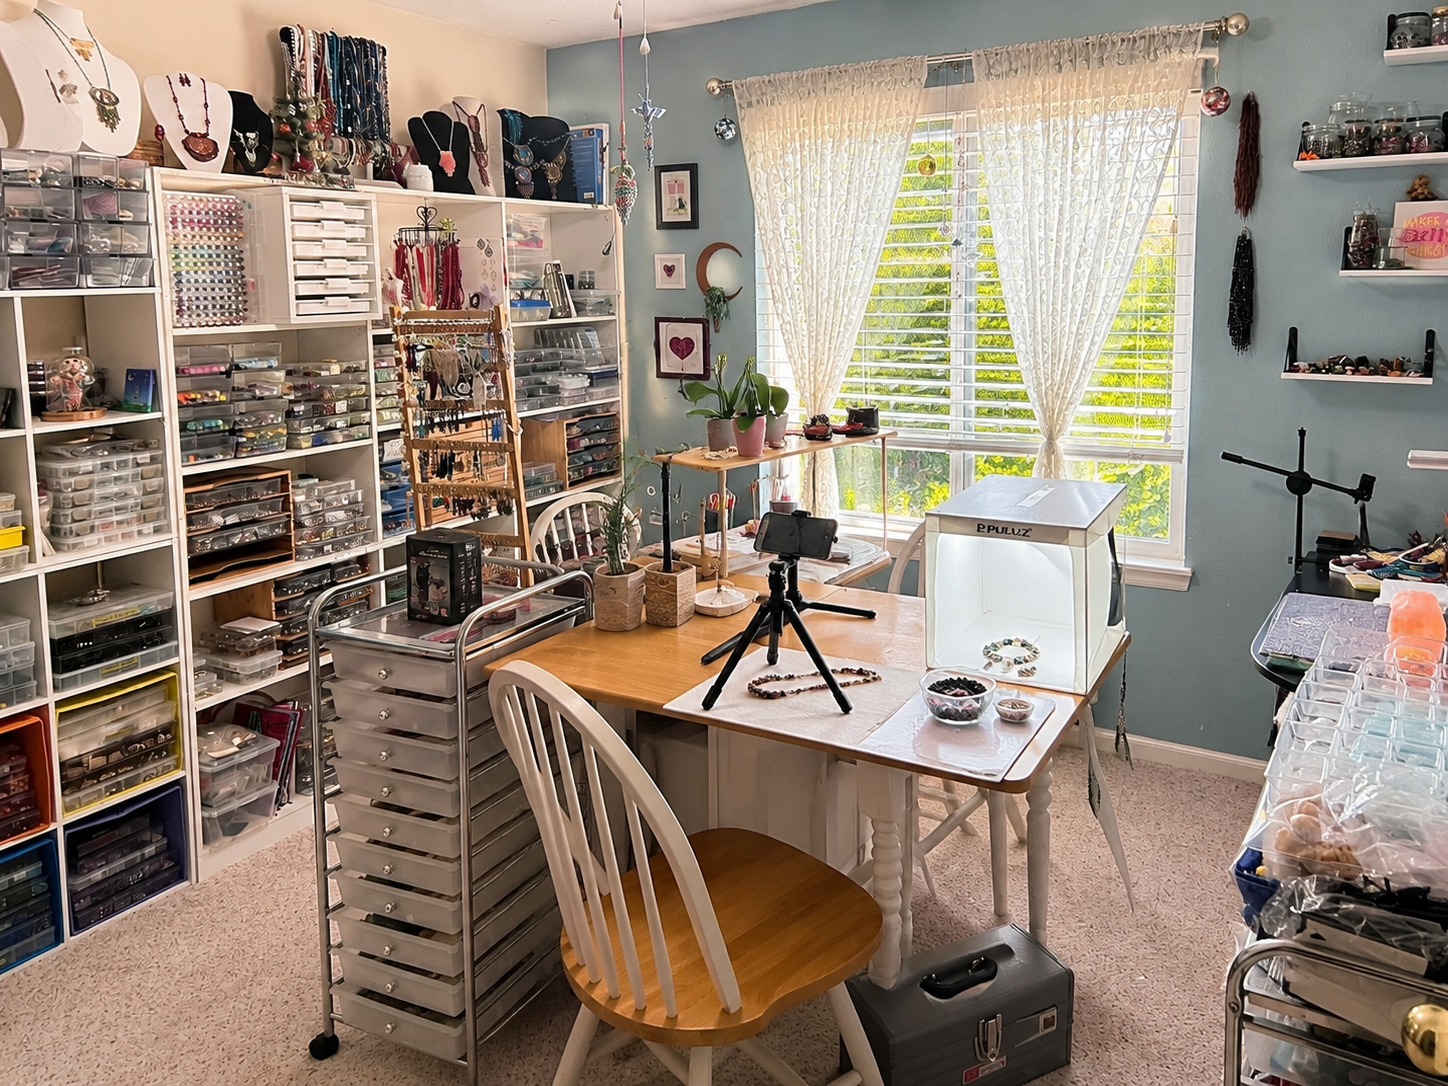
Turning Your SmartPhone Into a Jewelry Camera
Beautiful jewelry photography doesn’t require expensive equipment. Discover how natural light, patience, and a few simple tools helped us turn a smartphone into one of the most valuable tools in our studio.
Finding Beauty in Light, Detail, and the Handmade Process
This article contains affiliate links. As an Amazon Associate, Sun & Thread Sisters earns from qualifying purchases at no additional cost to you. We only recommend products we personally use, love, or believe would genuinely help fellow makers and artists.
When we first began photographing jewelry for Sun & Thread Sisters, we assumed beautiful product photography required expensive cameras, professional studios, and complicated lighting equipment.
What we discovered instead was something surprisingly encouraging:
Thoughtful light matters more than expensive gear.
Many of our favorite photographs have been created with nothing more than a smartphone, a nearby window, and a few simple tools that help capture the sparkle, texture, and tiny details that make handmade beadwork so special.
Jewelry photography presents unique challenges. Metallic finishes reflect everything around them. Crystals catch light in unexpected ways. Tiny seed beads that look vibrant in person can suddenly appear flat or dull in a photograph.
Learning to photograph handmade jewelry has become its own creative skill — one that continues to evolve alongside our beadwork.
Today we'd like to share a few of the lessons we've learned while turning an everyday smartphone into one of the most valuable tools in our studio.
Find the Light Before You Find the Camera
The single biggest improvement we ever made to our jewelry photography had nothing to do with the camera itself.
It was the light.
Natural window light remains our favorite way to photograph beadwork because it reveals texture and color in a way that artificial lighting often struggles to reproduce.
A north-facing window provides soft, consistent light throughout much of the day, while east-facing windows often create beautiful morning illumination. Harsh midday sunlight can create bright reflections and strong shadows, so we usually prefer indirect light whenever possible.
Sometimes moving a piece just a few inches closer to the window can completely transform the photograph.
When photographing metallic finishes, crystals, or iridescent seed beads, patience often becomes more important than equipment. Rotating the jewelry slightly or waiting for the light to soften can reveal details that were invisible only moments before.
Light is not simply part of the photograph.
In many ways, light becomes part of the design itself.
Stability Creates Sharpness
Seed beads are small.
Very small.
The incredible detail that makes beadwork so beautiful also makes it surprisingly difficult to photograph. Even the slightest movement of the camera can soften edges, blur bead holes, or reduce the sparkle of crystals and metallic finishes.
For a long time, we simply held our phones and hoped for the best.
Eventually we discovered that stability creates clarity.
Whether using a tabletop tripod, resting the phone on a stable surface, or using a simple phone stand, reducing camera movement creates noticeably sharper images and allows the tiny details of handmade work to shine.
This becomes especially important when photographing:
Size 15/0 seed beads
Crystal accents
Delicate fringe
Metal findings and clasps
Textured bead surfaces
Sometimes the smallest improvements create the biggest differences.
One of the simplest improvements we made to our photography process was reducing camera movement. A stable phone allows tiny details like seed beads, crystals, and metal finishes to remain sharp and clear.
We especially appreciate a tripod that can function as both a tabletop stand and a portable photography tool for studio work, tutorials, and artisan events.
View our recommended tabletop phone tripod
The Magic Lives in the Details
One of the greatest joys of beadwork is found in the details.
The soft glow of matte finishes.
The sparkle of faceted crystals.
The subtle color shifts of metallic seed beads.
The way thread disappears into the structure of a design while quietly holding everything together.
These details are often what make someone stop scrolling and take a second look.
Close-up photography allows those details to tell the story of the piece.
A single image of a clasp, bead texture, or crystal reflection can sometimes communicate more craftsmanship than an image of the entire necklace or bracelet.
As artists, we spend countless hours making these details matter.
Photography gives them the opportunity to be seen.
Capturing those details can sometimes be difficult with a smartphone camera alone. A clip-on macro lens allows you to photograph bead textures, crystal sparkle, metallic finishes, and intricate thread paths with much greater clarity and detail.
We especially appreciate versatile lens kits that allow both close-up macro photography and wider shots for larger pieces such as necklaces and amulets.
View our recommended macro lens kit for smartphones
Editing Should Reveal, Not Redesign
This philosophy has become one of the guiding principles of photography at Sun & Thread Sisters.
Our goal is never to create a prettier version of the jewelry than what arrives in the mailbox.
Instead, our goal is to create photographs that represent the piece as honestly and beautifully as possible.
We may adjust exposure, brightness, white balance, contrast, and sharpness.
But we never alter bead placement, colors, gemstones, crystal finishes, thread paths, hardware, or handmade construction.
Every piece carries the fingerprints of the creative process.
Those details deserve to remain exactly as they were created.
Authenticity matters.
The jewelry in the photograph should always be the jewelry that arrives in your hands.
Creating a Studio That Works for You
One of the most encouraging discoveries in our photography journey has been learning that a professional studio isn't required to create beautiful images.
Some of our favorite tools are surprisingly simple:
A nearby window
White poster board for reflecting light
Neutral backgrounds
A steady surface for the camera
A little patience
A willingness to experiment
Every artist eventually develops their own photography style just as they develop their own artistic voice.
Some prefer dramatic shadows.
Some prefer bright, airy images.
Some photograph outdoors while others create miniature studios inside their homes.
There is no single correct approach.
The best setup is often the one that encourages you to continue creating.
Natural window light remains our favorite photography tool, but cloudy days, winter evenings, and late-night creative sessions do not always cooperate.
A portable light box can provide soft, even lighting and consistent backgrounds, making it easier to photograph jewelry regardless of the season or time of day.
View our recommended photography light box
The Camera You Already Own May Be Enough
One of the most valuable lessons we've learned is that beautiful photography rarely begins with expensive equipment.
It begins with observation.
It begins with learning how light moves across a piece of jewelry.
It begins with noticing how crystals catch the morning sun or how metallic seed beads shift colors throughout the day.
Most of all, it begins with practice.
Photography, much like beadwork itself, improves one project at a time.
If you're a fellow artist, maker, or creative business owner, we hope these ideas encourage you to experiment, play, and share your work with confidence.
The world deserves to see what you're creating.
Sometimes all it takes is the camera already sitting in your pocket.
Final Thoughts
The best camera is rarely the most expensive one.
More often, it's the one that's already nearby when inspiration strikes.
At Sun & Thread Sisters, we've learned that photography and beadwork share something important in common: both reward patience, both improve with practice, and both invite us to slow down long enough to notice the details that make something truly special.
If you're a fellow maker, artist, or small business owner, we hope these ideas encourage you to pick up the camera you already own and begin sharing your creative journey with confidence.
Sometimes all it takes is a little light, a little curiosity, and the camera already sitting in your pocket.
Until our threads cross again...
May your thread stay untangled, your needle easy to find, and your creativity always lead you somewhere unexpected.
With gratitude,
Kristina & Kimberly
Sun & Thread Sisters
Nature Inspired • Heart Made • Sister Crafted.
Why Seed Bead Size Matters: Understanding 15/0, 11/0, 8/0 & More
Understanding seed bead sizes is one of the foundations of beautiful beadwork. Discover when to use 15/0, 11/0, 8/0, and 6/0 seed beads, compare their sizes, and gain confidence choosing the right beads for your next jewelry project.
Not all seed beads are created equal. Whether you’re new to bead weaving or expanding your skills, understanding seed bead sizes will help you choose the right materials, follow patterns with confidence, and bring your creative ideas to life. From handcrafted jewelry and wearable art to bead embroidery, ornaments, decorative art, mixed-media projects, and countless other beaded creations, choosing the right seed bead size is one of the beast foundations you can build.
Tiny Beads, Big Difference
One of the first things many new beaders notice is that seed beads come in a surprising variety of sizes. At first glance, they may all look similar, but once you begin creating jewelry, you'll quickly discover that bead size has a tremendous impact on the finished project.
The size of your seed beads influences everything—from the texture and flexibility of your design to the level of detail you can achieve. Choosing the right size can make a project easier to stitch, more durable, more visually balanced, and - when creating wearable pieces - more comfortable to wear.
Whether you're picking up a needle for the first time or adding another technique to your growing collection of skills, understanding seed bead sizes is one of the best foundations you can build.
What Do the Numbers Mean?
If you've ever wondered why seed beads are labeled 15/0, 11/0, 8/0, or 6/0, you're not alone. At first, the numbering system seems backwards.
The "/0" (pronounced aught) comes from an old sizing system. Originally, it referred to how many beads could fit side-by-side within a given length. The greater the number of beads that fit into that space, the smaller each individual bead had to be.
So, a 15/0 bead is smaller than an 11/0, while an 8/0 and 6/0 become progressively larger.
A Quick Reference Guide
The chart below highlights the four seed bead sizes you’ll encounter most often. Historically, seed beads have been produced in sizes ranging from approximately 24/0 to 1/0, although availability varies by manufacturer, country of origin, and time period. Because there is no single worldwide sizing standard, you may occasionally find slight difference between brands.
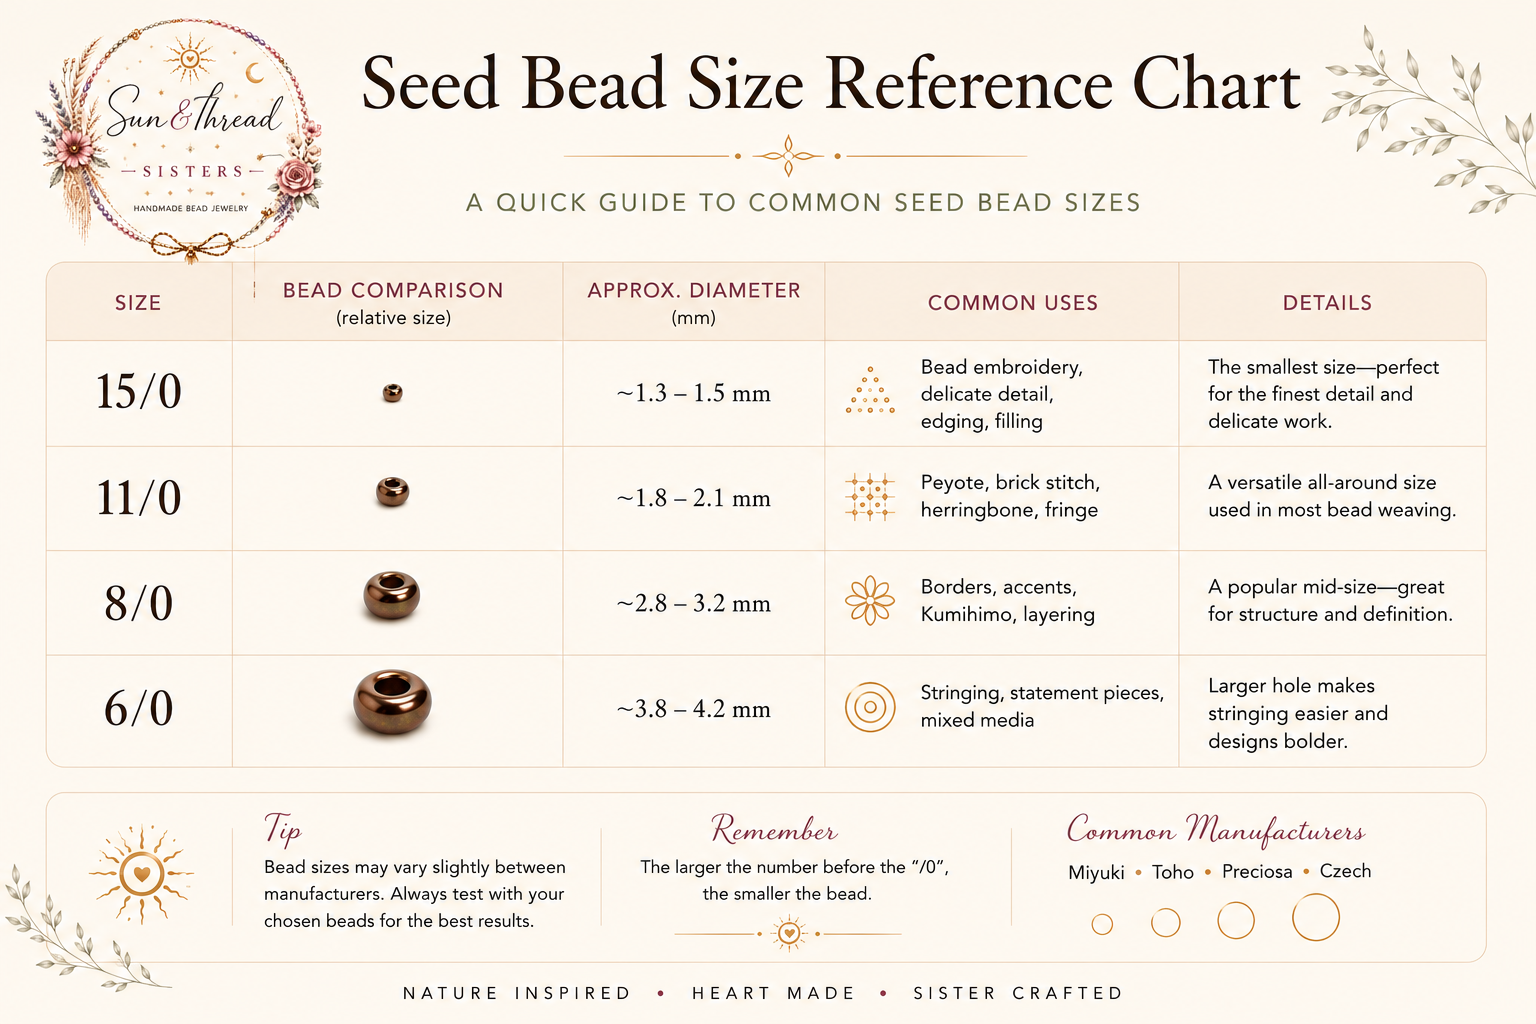
Sun & Thread Sisters seed bead size reference chart comparing 15/0, 11/0, 8/0, and 6/0 seed bead sizes with common uses and approximate diameters.
Although the historical sizing system isn't perfectly standardized today, these size numbers remain the universal language of seed beads used by bead artists around the world.
Did you know? Many bead artists begin with 11/0 seed beads because they’re the most versatile size available. As your skills grow, you’ll naturally add 15/0 beads for delicate work and 8/0 or 6/0 beads for texture and larger designs.
Getting to know the Most Common Seed Bead Sizes
15/0 Seed Beads
Tiny and delicate, 15/0 seed beads are perfect for adding fine detail. They're often used to create smooth bezels around cabochons, finish edges, fill small gaps, and add texture to bead embroidery or intricate bead weaving.
Because they are so small, they require patience, good lighting, and a steady hand. The reward is beautifully refined work with crisp, elegant details.
At Sun & Thread Sisters, I often use 15/0 seed beads when a design calls for precision or delicate finishing touches. Although they require a little more patience, these tiny beads can transform a good design into one with exceptional detail and refinement. In my Half Tila Basket Weave Bracelet Tutorial, I recommend Miyuki or Toho 15/0 seed beads for their consistency, beautiful finishes, and dependable quality.
11/0 Seed Beads
If there is one size that belongs in every bead artist's studio, it's the 11/0.
Often called the workhorse of bead weaving, 11/0 seed beads are one of the most versatile beads available. You'll find 11/0 seed beads used in countless techniques, including peyote stitch, brick stitch, herringbone, netting, right-angle weave, ladder stitch, and many more.
Both Miyuki and Toho manufacture excellent 11/0 seed beads, each offering outstanding quality and consistency that bead artists around the world have come to trust
8/0 Seed Beads
Larger than 11/0s, 8/0 seed beads create bold texture while remaining comfortable to work with, making them an excellent choice for beginners.
They're commonly used for decorative borders, stringing projects, Kumihimo, and designs where the beads themselves become part of the visual statement. Their larger holes also make multiple thread passes easier, making them especially forgiving for beginners and techniques that require reinforcing stitches.
6/0 Seed Beads
The largest of the commonly used seed bead sizes, 6/0 beads make a dramatic impression. They work beautifully in necklaces, bracelets, ornaments, mixed-media art, and decorative embellishments. They’re popular in fiber arts, ornaments, decorative home accents, and larger sculptural beadwork where bold texture becomes part of the design.
Combined with smaller seed beads, they add depth, texture, and visual contrast to a design.
As you continue exploring bead weaving, you’ll naturally discover that no single bead size is “better” than another. Each size serves a different purpose, and many of the most beautiful projects combine several sizes to create depth, texture, movement, and visual internest. Learning when to use each size is a part of the joy of growing as a bead artist.
Size Affects More Than Appearance
Choosing the right seed bead size isn't simply about making something bigger or smaller.
Smaller beads allow you to create delicate curves, intricate patterns, and refined finishes. Larger beads produce bold lines, stronger texture, and projects that often work up more quickly.
The same pattern stitched with 15/0 seed beads can look elegant and highly detailed, while the same design created with 8/0 beads may feel rustic, playful, or contemporary.
Understanding these differences gives you more creative freedom as an artist.
Why Consistency Matters
Not all seed beads are manufactured with the same precision.
Japanese manufacturers such as Miyuki and Toho are known throughout the beading community for producing remarkably consistent seed beads. Their precision makes them favorites among bead weavers, especially for techniques like peyote stitch, brick stitch, herringbone, and tapestry work where even tiny variations can affect the finished design.
Uniform bead sizes allow stitches to line up neatly, thread paths to remain even, and finished jewelry to drape beautifully.
Choosing high-quality beads often makes both the stitching experience and the finished piece noticeably better.
Personally, my favorite beads for precision bead weaving are Toho Aikos. Their exceptional consistency makes them my first choice for peyote stitch, brick stitch, loom weaving, and other techniques where perfectly uniform beads produce the cleanest results.
Building Your Collection
When you're just beginning your beading journey, it's easy to feel overwhelmed by the seemingly endless variety of colors, finishes, and sizes available.
The good news is—you don't need them all.
A small collection of quality 11/0 seed beads in several neutral colors will carry you through countless projects. As your skills grow, you can gradually add 15/0 seed beads for fine detail and 8/0 or 6/0 seed beads for bold texture and larger designs.
Building your collection slowly allows you to discover the colors, finishes, and styles that inspire you most.
My Favorite Starting Collection
If I were helping a new bead artist build their very first seed bead collection, I'd begin with quality 11/0 Miyuki seed beads in a few versatile colors such as silver-lined crystal, matte black, ivory, bronze, and gold.
From there, I'd add a handful of favorite colors that make you smile. As your confidence grows, begin adding 15/0 beads for fine detail and 8/0 beads for texture and accents.
There's no need to buy hundreds of colors all at once. A thoughtfully chosen collection will inspire far more creativity than an overflowing drawer of beads you've never used. Looking back, I wish I had started with quality beads from the very beginning rather than buying every color at a big box store, when they went on sale. I also learned to buy only for each project and what is needed to create it. Investing in quality beads and components has. helped me create better projects and enjoy the process even more.. As you collection grows, let your curiosity guide you. Every new color, finish, and bead size becomes another opportunity to experiment, learn, and develop your own creative style.
Every Bead Has a Purpose
One of the things I love most about bead weaving is that every tiny bead contributes to the final design. Individually they may seem insignificant, but together they create beautiful works of art filled with color, texture, and craftsmanship.
Understanding seed bead sizes isn't about memorizing numbers—it's about learning the language of beadwork and discovering how each size contributes to the finished design.
The more familiar you become with these sizes, the more confidently you'll choose materials, follow patterns, and create designs that reflect your own artistic vision.
Whether you're stitching your very first bracelet or your hundredth, every bead is another opportunity to learn, create, and enjoy the process.
Happy beading!
Kristina Amato
Sun & Thread Sisters
If you enjoyed this article, you may also like:
Meet the Tila Family: Understanding Tila, Half Tila & Quarter Tila Beads
Join us every Tuesday for a new Journal Entry filled with tips, tutorials, and inspiration. Is there a beading topic you’d like us to cover? We’d love to hear from you! Send us your ideas, and they may inspire a future Sun & Thread Sisters Journal Entry.